Chantry's Pantry

  • about
  • recipes
  • dressing guide
menu icon
go to homepage
  • about
  • recipes
  • dressing guide
    • Facebook
    • Instagram
    • Pinterest
  • subscribe
    search icon
    Homepage link
    • about
    • recipes
    • dressing guide
    • Facebook
    • Instagram
    • Pinterest
  • ×
    Home

    7 Common Meal Planning Mistakes

    February 18, 2019 by Chantry Leave a Comment

    meal planning template flatlay with phone, pen, and cup of tea

    Meal planning is all the rage right now, and for good reason! But if you ever try to implement it into your routine you may find a few hiccups along the way. I know I have! Read on to discover some common meal planning mistakes so you can avoid them. 

    NOT BEING FLEXIBLE

    We all know that things don’t always go as planned. This can be devastating when you’ve dedicated a big chunk of time to pick your meals out.

    At least once a week you’ll end up with a night that doesn’t fit in with your meal plan. This can happen when you end up not being home one night, not feeling well enough to put dinner together, or spending a night sobbing over a pint of ice cream after finding out that Fixer Upper was ending (don't tell me you weren't disappointed).

    Instead of getting frustrated with yourself or at meal planning in general, you can make this work in your favor. I tend to have meals that use fresh ingredients that don’t last long and meals that use ingredients that last a little longer. I use the latter meals toward the end of the week.

    If I end up not using one of the meals on the night I have planned I simply shift my dinners to different days and stretch out my plan a little longer. This can mean that you wait another day to do your grocery shopping or you have one less meal to plan for the next week.

    For example, let’s say that I end up not making dinner on Tuesday. I had planned on making a hearty salad. I decide to make the salad on Wednesday and shift the rest of the meals out one day so I can still use my fresh ingredients before they go bad.

    NOT TAKING INTO ACCOUNT WHAT FOOD YOU ALREADY HAVE 

    If you love to cook, Pinterest can be like making a Christmas list while window shopping, when it comes to recipes. This is why it is a good idea to shop your pantry before you browse online or through your cookbooks to find inspiration for meal ideas.

    Most of the time you can come up with at least a couple of meals that you have most of the ingredients for already. Including these meals in your meal plan can help cut your grocery bill down.

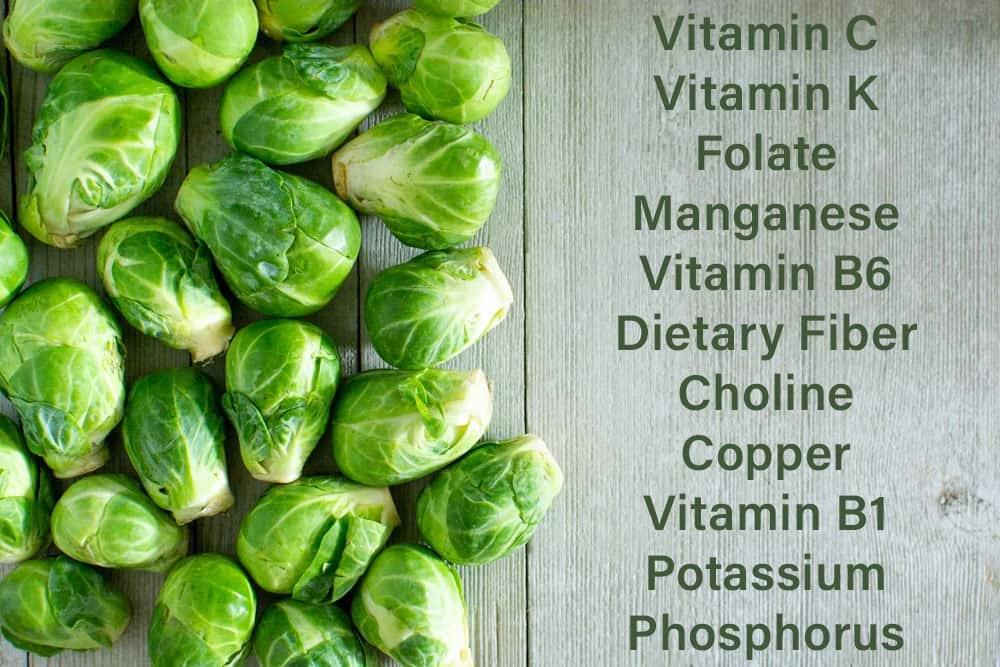
    For example, this week I had some onions and sweet potatoes still in my pantry and was able to plan a night for my Rosemary Sweet Potato Soup. This required no extra ingredients, just the addition of a few staple items I always have on hand.

    I also had some frozen vegetables and stir fry noodles which turned into another night planned for stir fry.

    MAKING IT TOO COMPLICATED

    Meal planning can become complicated very fast. A few people can juggle or enjoy the chaos, but for most, it can be overwhelming. Don't make this meal planning mistake!

    When I first started out I wanted to spend less money on my groceries. I loved the idea of using the same ingredients for different meals so I could buy things in bulk and save money.

    It took a lot of work for me to plan my meals around using similar ingredients while keeping enough nutritional variety across my meals.

    I got burnt out very fast and ended up giving up on meal planning for a while before trying it out again.

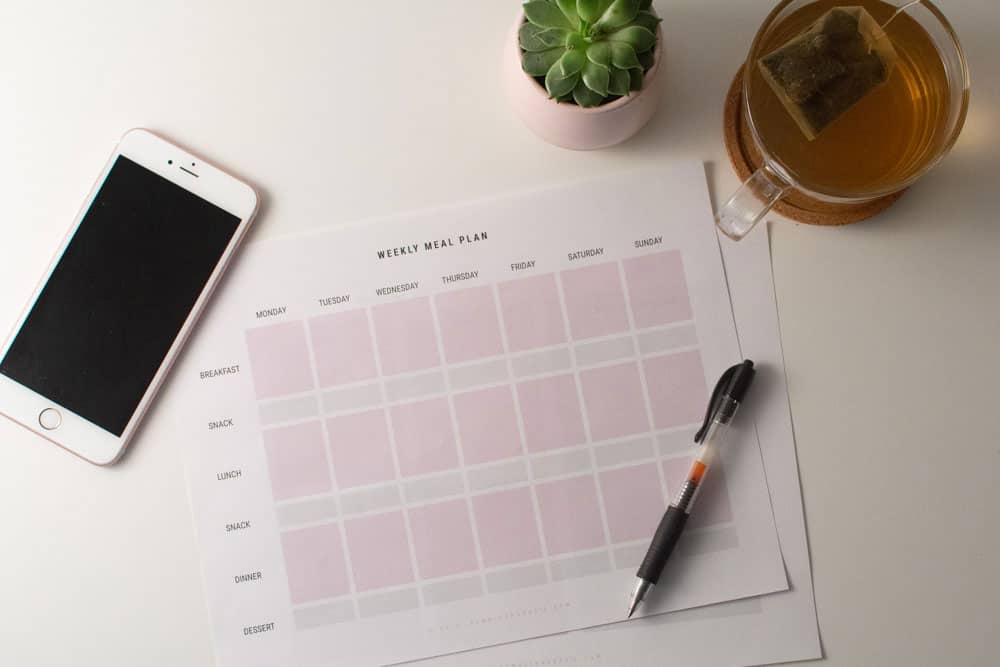
    If you are just starting out, go easy. For you, this might mean only planning out dinners instead of all three meals. Maybe it means only planning out 3 nights or days at a time. When you get the hang of what you are doing you can always add in new elements.

    On the same note, if you are feeling overwhelmed with it you can always scale back. Another option is to use a meal planning app, program, or template that does the work for you.

    GIVING UP TOO EASILY

    I mentioned already how I gave up meal planning after the first attempt. I didn’t try it again for about a year.

    After my second attempt at using a different method, I fell in love. I realized that the benefits are too important to me to give up on it again.

    There are so many methods to try and it is important to spend the time figuring out which one works for you. Try one method one week and another method the next week. I still switch it up depending on my mood!

    For ideas on different meal planning methods to here.

    It can definitely still be a chore. And there are some weeks where I don’t get to it. But it has become a regular part of my routine, and now I have a hard time living without.

    NOT STICKING WITH THE PLAN

    I know that I said it is important to be flexible in case things fall through.  But don’t let this happen every night. Really make an effort to stick to the plan that you spent valuable time on. In the long run, it will make your life easier. This is one of my most common meal planning mistakes. 

    ONLY PLANNING DINNER

    When you first start meal planning I suggest only planning dinners in order to keep things simple. However, if you never venture into planning out your other meals you’ll miss out on the benefits it has to offer.

    Planning out your other meals can still be simple. You can plan on getting sandwich fixings for the whole week and having one to three breakfast ideas that you rotate through.

    Having breakfast and lunch already planned out makes your day that much easier!

    NOT TURNING IT INTO A HABIT

    I don’t believe that we really own any good behavior until it becomes a part of us through consistent repetition. I know that meal planning isn’t some amazing act that sets us apart. But I do think that it frees up valuable time which we can use to do something that does set us apart.

    When it becomes something that you automatically do every week, that is when you really start to reap the rewards. Be persistent and give it time.

    Turning meal planning into a habit has helped me in more ways than one. Or even two. It will help you too. Trust me and stick with it!

    What meal planning mistakes have you made? Are there any others you can think of that I haven't mentioned here? Let me know in the comments below!

    How to Have a Romantic Meal at Home

    February 12, 2019 by Chantry Leave a Comment

    Bowl of creamy pasta with sun-dried tomatoes

    My husband is in law school and doesn’t get the chance to cook for me very often. But when he does, Oh Man! I fall in love all over again. He is an amazing cook and knows how to make a romantic meal.

    These days when we need a date we typically go out to eat because we have kids and need the alone time. If you are in the same sitch can I suggest sending your kids out for the night or at least putting them to bed early?

    It really is a game changer in the romance department when you are alone. There are fewer distractions, interruptions from waiters, and opportunities to lose focus on your date. Plus, you are completely in charge of the atmosphere! Dimmed lights? Done. Specifically curated playlist? Go for it.

    Also, even if the food isn’t perfect, it means so much more when somebody makes it for you instead of paying somebody else to. That’s not to say that going out to eat can’t be fun and romantic but sometimes, staying in makes things feel super special.

    For an extra special night try cooking together! It’s one of my favorite things to do with Austin.

    How can you make sure that your homemade meal really packs a romantic punch? Follow these guidelines and you’re halfway there.

    What to make

    I love food. Like really really love food. And I personally think that any food can be sexy or turned into a romantic meal. It’s more about the atmosphere and the effort than it is about what you are eating.  That being said here are a few tips to follow.

    Favorite Foods

    If your significant other has a favorite food or something that they have always wanted to try, then you already have a pretty good idea of what you should make.

    On the other hand, if you don’t know your date very well, or at least not their food preferences, then having a few different options can be helpful. I don’t mean a few different meals, but a meal with a few different components. For example, instead of serving one-pot pasta, serve a main dish like chicken, with a couple different sides.

    Don’t use ingredients that result in bad breath or flatulence

    When I eat onions you can smell them on my breath for about four days. And it’s awful. At least that is what my hubby tells me. I personally think onions smell delicious! But whatever.

    The night before I got married, my parents took me out to dinner. Without thinking about it, I ordered a dish with onions in it. Terrible idea. The next day I had THE WORST breath!

    Surprisingly, Austin still said yes at the altar. He may have been covering his nose as he said it, but hey, I can’t fault him for that! Eight years later and I still feel guilty for ruining his wedding day.

    To keep things smell free, avoid making anything that can cause bad breath or flatulence. Common culprits for bad breath are garlic, onions, spicy foods, tuna, and for some, dairy.  Some foods that cause flatulence are dairy, legumes, and dried fruit.

    Nothing ruins a romantic meal like bad smells and embarrassment!  Don’t let this happen to you.

    Include drinks, appetizers, and dessert.

    We almost always have water with our meals. So when we decide to drink something else, it screams special. We don’t drink alcohol so I couldn’t tell you what wine goes with what food. But we love a fun mocktail or sparkling drink.

    It is also fun to have a simple appetizer. This could be a fun dip, bruschetta, olives, pinwheels, you get the idea. I like having an appetizer because it keeps me from getting hangry while waiting for my dinner! I know I am not the only one. Plus if you are cooking together it is fun to have something to eat during the process.

    And we can’t forget dessert. This can be as simple or as complicated as you want. It’s dessert. So really you can’t go wrong. Especially if it includes chocolate. I WILL fall in love with you if you give me chocolate. Enough said.

    Avoid food that is hard to eat.

    This is a suggestion mostly for a budding relationship. Some people don’t mind that kind of embarrassment but some do. If you are in a well-seasoned relationship you shouldn’t worry. Sometimes hard to eat food is also really fun and delicious!

    Some foods that can be difficult to eat are shelled seafood, bruschetta, ramen soup, anything super crunchy, etc.

    Don’t experiment unless you are cooking together

    Part of the joy of cooking with Austin is experimenting with new foods. If you are into that go for it! It’s super romantic.

    However, if you are cooking solo for your date I don’t suggest cooking something that you have never made before. Too many things can go wrong with even the simplest of meals.

    Either practice once or twice before the date, make something you have made before, or find a foolproof recipe!

    On the same note, read the instructions all the way through before you start! When I say before, I mean at least a day before. I have on more than one occasion, pulled all my ingredients out to make a meal only to realize that I needed to start an hour earlier, or rest dough overnight. You don’t want to keep your date hungry because of a timing issue.

    Clean as you cook or make something that doesn’t require too much clean up.

    It is very difficult to relax when you know that there is a mess lurking around the corner. You don’t need to have a sparkling clean kitchen to move on with your date after dinner. But you should make sure that it isn’t overwhelmingly dirty either.

    The exception to this is if you are cooking dinner together and get in a flour fight. Cuz what isn’t fun and romantic about that? Am I right?

    Perfect the Atmosphere

    Dim the lights, turn on a fun romantic playlist and set a pretty table. Don’t overdo it or you will go from relaxed to uncomfortable. Unless extravagance is just your thing. A flower, a couple simple candles, and some fun drinking glasses should do the trick. Also, a tablecloth never hurts!

    I hope these tips help you pull off a truly romantic meal with your special person! Let me know what your favorite thing to cook for a date is in the comments below.

    How to Deseed a Pomegranate

    January 24, 2019 by Chantry Leave a Comment

    picture of a whole pomegranate and cut up pomegranate

    Have you ever wondered how to deseed a pomegranate without dedicating a day and a half to extracting each one? Those little crunchy, juicy, flavorful nuggets of joy sent straight from heaven?

    The task is nowhere near as daunting as you might think. I promise, you’re only a few minutes away from those delectable morsels.

    When deseeding a pomegranate there are really only two things that you need to decide: (1) How to open or cut the pomegranate and (2) How to extract the seeds.

    My favorite methods for deseeding pomegranates are either cutting in half or making the flower and then whacking the pomegranate. It is fast and easy and I’m not looking for commitment.

    Cutting the Pomegranate

    There are a couple different ways to cut a pomegranate. Try out a few of them and see which one you like the best. Kind of like cracking an egg with one hand or two (or deciding either of those ways are just too complicated...), you’ll quickly develop a preferred method for accessing the treasures inside this wonderful fruit.

    One trick that you can use before any of these methods is to roll the pomegranate around on a hard surface with a little pressure to loosen up the seeds a bit. Sometimes this can make the deseeding process go a little smoother.

    Cutting Method #1: Cut in Half

    Cutting pomegranate through equator

    The first way to cut a pomegranate is to cut it right in half. You still with me? Pretty simple right?  

    Many people advise against doing it this way because you end up cutting into a couple of the seeds and losing some juice. However, if you are cutting for yourself and not doing anything fancy with it just go for it. It is faster than the other methods. But if your pomegranate is on the small end than one of the other methods might be easier.

    two halves of pomegranate

    I use this method even when I am doing something fancy because the juice loss is minimal and I never even notice the two or three seeds that might have been harmed.

    Cutting Method #2: The Flower

    Cutting pomegranate around calyx

    The second way to cut a pomegranate takes a little longer, but not much longer, and I think it’s pretty fun anyway.

    The first thing you need to do is find the calyx, or what I call the crown, of the pomegranate. Hint: It looks like a crown. Or a nob. Or an outie belly button on a pregnant lady.

    Look down the fruit and locate where the slope starts to drop down the sides of the fruit. Cut a slit around the top of the pomegranate. Make sure you don’t cut too deep so you can avoid cutting the seeds.

    Next, gently pry the top off and and enjoy your first peek of those beautiful red seeds (or arils if you want to get technical.)

    Crown taken off pomegranate

    Now you are going to make three to four slits on the sides following the lines of the pith. Cut until you are about an inch or so from the bottom of the fruit.

    Cutting down the side of pomegranate
    Cutting down not quite to the bottom
    Splaying open sides of pomegranate

    At this point, you should splay the pomegranate open like a flower and move on to the extraction process.

    Cutting Method #3: Separate wedges

    separate section of pomegranate

    This method is similar to the last one only we are going to cut all the way through and separate the chunks of fruit.

    Cut the crown off the pomegranate, then turn it over and cut the bottom off the same way.

    Now cut down the sides of the fruit along the pith five or six times and pull the sections apart.

    Extraction

    Deseeding Method #1: The Whack

    wacking pomegranate with spoon

    This is my favorite method because it is fast and easy. Some people don’t like this method because it can be messy. I have also heard claims that it damages the seeds. But I have never had a problem with less than stellar seeds and I have whacked many a pomegranate.

    As for the mess, you do want to be careful because pomegranate juice can stain. But I have dodged all juice missiles by using a big deep bowl. Super easy. Most people I have seen struggle with this method have tried to knock the seeds out onto a plate or shallow bowl. Bad idea.

    Holding pomegranate over bowl

    If you are still worried about the mess you can easily cover the pomegranate and bowl with an old (not favorite) kitchen towel before you start whacking. Just be careful not to smack your hand in the process.

    wacking a pomegranate covered by a towel

    You’ll want to use either of the first two cutting methods before you start whacking. It is hard to whack seeds out of a small section of pomegranate so steer clear of the third method.

    Grab your pomegranate in your less dominant hand with the seed side down.

    Now, using the back of a wooden spoon, gently (unless you need to let out some frustration) whack the back of the pomegranate until all or most of the seeds fall out.

    Deseeding Method #2: Manually peeling out the seeds

    I don’t love this method.

    Like really don’t like it.

    But I have to throw it in here so you really know your options. And if it ends up being your favorite, you’re welcome.

    peeling seeds out of pomegranate

    This method is for the patient as you are peeling the seeds out of the fruit with your fingers. It sounds simple and it's really not complicated. But I 100% do not enjoy doing it this way. It takes a long time and can also get messy. Like really messy.

    I have to admit that I know people (ok maybe one person) who grew up using this method and thinks that I am complicating the process. If you resonate with them then keep on keeping on.

    Deseeding Method #3: Water

    This method is supposed to be gentler on the seeds than whacking and some say that the water helps the seeds detach from their skin easier.

    You can use cutting methods 2 or 3.

    peeling pomegranate seeds in a bowl of water

    Fill a big bowl of water and submerge the pomegranate pieces into it. With your hands and the pomegranate underwater, break the seeds out of the skin.

    The advantage of water is that the pith (the off white membrane that surrounds the seeds) that comes out with the seeds will float in the water while the seeds sink. You can easily scoop the pith out with a small mesh strainer or your hands if you want to get fancy.

    Side note: You can use water to separate pith with the other two methods as well. Just pour water over your already extracted seeds and the pith will float to the top.

    bowl of water with pomegranate seeds in bottom and pith floating on top

    If you want to save any of the juice that might have come out while deseeding than you will want to strain it off before you pour water on the seeds. Or you can just pick the pith out with your fingers.


    Now go enjoy those juicy morsels!

    Try them in this delicious grapefruit pomegranate kale salad!


    What is your favorite method for deseeding a pomegranate? Do you have another method that I haven’t mentioned here? Let me know in the comments!

    5 Important Questions to Ask Before You Buy Honey

    June 7, 2018 by Chantry Leave a Comment

    Jar of honey

    I love to use honey in place of processed sugar. It has a long list of health benefits and is simple to substitute in recipes. To get all the benefits of eating honey it is important to buy some from a good source. I used to think it was just about whether other sugars were added to the honey before it was sold or not. While we should avoid honey that has added sugars there are also other things to watch out for. To keep it simple I created a list of 5 questions to ask before you buy honey.

    Jar of honey

    One of my earliest memories of eating honey was my mom showing me how to eat it with butter over a slice of her fresh baked bread. I am convinced that butter and honey were one of the first matches made in heaven. Add them to fresh homemade bread and the sweet flavor and velvety texture take you to a whole other world.

    It took months for my mom to perfect her bread recipe and even now when I reach for my honey I can almost smell her bread. Many years later I still love honey served over fresh bread. Really, who doesn’t?

    Honey dipper with honey

    Besides being natures best sweetener, honey can help with allergies, boost the immune system, help promote healthy sleep, maintain healthy blood sugar, and help with coughs and sore throats. (1) I know, this list makes me giddy too! This is just a “taste” of the superpowers that belong to honey and we will talk more about them in a future article.

    The best source of raw honey would be from a local beekeeper. If that is not an option it is carried in most health food stores. I have also started to see it in a couple of normal grocery stores.

    Want to get the most out of your honey? Here is a list of questions to ask when searching for a great quality honey:

    1.  What temperature do you heat your honey to when bottling it?

    To really get the most out of your honey you need to find a good source of raw honey that hasn’t been pasteurized. Honey gets pasteurized in order to delay crystallization. However, when honey is pasteurized it loses many of its beneficial enzymes.(2) This is similar to how vegetables lose their enzymes when cooked at high temperatures.

    For honey to be raw it should not be heated higher than 95 degrees. This is the temperature of honey while it is in the hive. (3) When heated above this temperature honey starts losing its benefits.(4)  Some beekeepers don't need to heat their honey and others struggle with the time it takes to bottle without warming it up.

    2.  Where are your hives located?

    Your beekeepers may be local but that does not mean that your honey is. If you want to use raw local honey as a remedy for seasonal allergies (5) this is a very important question. Many beekeepers live locally but keep their hives in a much farther location than what you need.

    Bee pollinating purple flower

    3.  Do you ship your bees out to pollinate?

    This question is an extension of the last question. Beekeepers often relocate their bees to other parts of the country to pollinate crops in need. This service is beneficial to farmers (and helps the beekeeper generate some extra income), but the practice is extremely taxing on the bees. The bees are confined during travel causing stress. They are exposed to chemicals used to treat the crops. And they receive limited nutrition as they are only pollinating one crop. (6)

    4.  What do you feed your bees? And when?

    When beekeepers harvest honey they are taking their bees food. Fortunately, bees often make more honey than they need. Some beekeepers try to only harvest the excess. Many beekeepers, however, take more than their bees can spare and give them some form of sugar as a replacement. There are times when it is more acceptable to feed bees sugar--including when there is not enough foraging (plants with nectar and pollen that are in bloom) available or when there is a new hive in need of some extra nourishment. Look for beekeepers who feed their bees only when necessary and with a good quality organic sugar.

    Jar of honey on wood board

    5.  How do you deal with disease and parasites?

    I hope your beekeepers are doing everything they can to keep a strong hive of bees and consequently don't see a lot of disease and parasites. Many beekeepers use antibiotics and chemicals to treat their bees and keep them “strong.” However, there are plenty of beekeepers that believe in treatment free beekeeping. If you can find honey from treatment free beekeepers you have hit a jackpot.

    Bee on flower

    It can seem overwhelming but it doesn't need to be. The first step is to look for an organic, raw and unfiltered honey. Then you can dig deeper from there. 

    Looking for a way to enjoy your honey? Try my Honey Glazed Popcorn!

    Have you found a good source of local raw honey? Please share your favorite place to buy honey in the comments.

    SaveSave

    SaveSave

    SaveSave

    SaveSave

    SaveSave

    SaveSave

    SaveSave

    SaveSave

    SaveSave

    SaveSave

    Brussels Sprouts 101

    May 8, 2018 by Chantry Leave a Comment

    bowl of raw brussels sprouts

    Fun fact: Brussels sprouts get their name from the capitol of Belgium, Brussels, where they were cultivated in the 16th century. This is why you will always see an "s" on the end of Brussels even when referring to only one sprout. It is also why the "B" is always capitalized. 

    picture of brussels sprouts-every day i'm brusselin

    Brussels Sprouts Resume

    Brussels Sprouts are amazing. They belong to the cruciferous family along with cabbage, broccoli, and cauliflower. Vegetables from the cruciferous family have been shown to

    • lower the risk of type 2 diabetes (1)
    • help prevent cancer (2)
    • reduce inflammation (3)
    • reduce the risk of cardiovascular disease (4)

    One cup of Brussels sprouts has more than the current recommended daily amount of both vitamin C and vitamin K. One cup of Brussels sprouts will give you roughly the same amount of vitamin C as an orange. They are also a great source of folate, manganese, vitamin B6, dietary fiber, choline, copper, vitamin B1, potassium, phosphorus and omega-3 fatty acids. (5)

    Brussels sprouts have a nutrient density score of 32.23—this is a fancy way of saying that they have an insane amount of nutrients relative to their low-calorie count. Go Brussels Sprouts!

    If you have been avoiding Brussels sprouts now is the time to rethink your position and give them another try.

    Brussels with list of nutrients they provide

    When are Brussels Sprouts in Season?  

    Brussels sprouts are in season late fall to early winter. The best time to buy them is right after the first frost—they produce sugars in response to the cold and are at their sweetest.

    How to Select 

    Most of the time Brussels sprouts will be loosely packed at the grocery store. But sometimes you will find them still on the stalk which indicates a fresher sprout. Look for sprouts that seem heavy for their size. Their leaves should be tightly packed and bright green. Loose or yellow leaves indicate old sprouts. The smaller sprouts tend to be sweeter so pick sprouts that are close in size so they have a similar flavor profile.

    Bowl of raw Brussels on light wood background

    How to Store 

    Store your sprouts in a plastic bag in the crisper drawer. If you buy them on the stalk leave them on the stalk until you are ready to use them—they will stay sweeter this way. Brussels sprouts can last up to a few weeks if you buy them fresh. However, the sooner you eat them the sweeter they will be.

    How to Prepare 

    Start by trimming off the end or bottom of each sprout and peeling off any loose leaves. Depending on how you want to cook them you can leave them whole, cut them in halves or quarters, slice them, or shred them.

    Brussels sprout on fork

    How to Cook 

    You can eat them cooked or raw. They are delicious shredded raw into a salad or coleslaw like this one. If you want to cook them they are good sautéed, roasted, steamed, or braised. You can also boil them but overcooking will result in sprout hatred! My favorite way to cook them is to halve them, toss in a little oil and salt and roast them for about 15-25 minutes at 400 degrees F.  If they taste mushy or bitter they may be overcooked.

    What is your favorite way to eat Brussels sprouts? If you used to hate them like I did, please share the recipe that converted you below!

    SaveSave

    SaveSave

    SaveSave

    SaveSave

    SaveSave

    SaveSave

    SaveSave

    SaveSave

    SaveSave

    SaveSave

    SaveSave

    SaveSave

    SaveSave

    SaveSave

    SaveSave

    SaveSave

    SaveSave

    SaveSave

    SaveSave

    SaveSave

    SaveSave

    SaveSave

    SaveSave

    SaveSave

    Footer

    ↑ back to top

    About

    • Privacy Policy

    Newsletter

    • Sign Up! for emails and updates

    Copyright © 2025 Chantry's Pantry